Windows 10/11 and SMB guest access

Windows SMB change and how to lock down your Raspberry Pi with SMB3 encryption:

Windows 10/11 and SMB guest access
Starting with Windows 10 version 1709 (Fall Creators Update) and all Windows 11 releases, Microsoft disabled unauthenticated “guest” access over SMB2 and SMB3 by default to block insecure, unencrypted logons (MKS Technology Inc)
URL: https://support.microsoft.com/en-us/help/4046019/guest-access-in-smb2-disabled-by-default-in-windows-10-and-windows-server-2016

Configuring your Raspberry Pi for SMB3-only, encrypted shares
Samba ≥ 4.2 (your 4.17.12 build included) fully supports SMB 3.x and on-the-wire encryption (Server Fault)
URL: https://serverfault.com/questions/913504/samba-smb-encryption-how-safe-is-it

Replace your /etc/samba/smb.conf with this:

[global]
   workgroup = WORKGROUP
   netbios name = raspberrypi
   server string = Raspberry Pi SMB3 Encrypted
   security = user
   map to guest = never
   usershare allow guests = no
   guest account = nobody

   server min protocol = SMB3
   server max protocol = SMB3
   client min protocol = SMB3
   client max protocol = SMB3
   smb encrypt = required

[data]
   comment = Encrypted SMB3 Share
   path = /data
   browseable = yes
   writable = yes
   valid users = pi
   create mask = 0775
   directory mask = 0775

  1. Prepare the share directory and permissions: sudo mkdir -p /data sudo chown pi:pi /data sudo chmod 775 /data
  2. Add pi as an SMB user: sudo smbpasswd -a pi
  3. Apply changes: sudo systemctl restart smbd

This forces only SMB 3.x connections with required encryption, and only user pi can connect (Server Fault)
URL: https://serverfault.com/questions/895570/how-to-configure-samba-to-work-with-windows-10-1709

Verifying your setup

With these steps, your Windows 10/11 systems stay locked against guest shares, and your Raspberry Pi serves its data only over encrypted SMB 3 connections.



Keep your PC safe and updated with “winget”

Windows now has a powerful package manager called winget, which makes it super easy to update all your installed applications with just one click – just like on Linux!

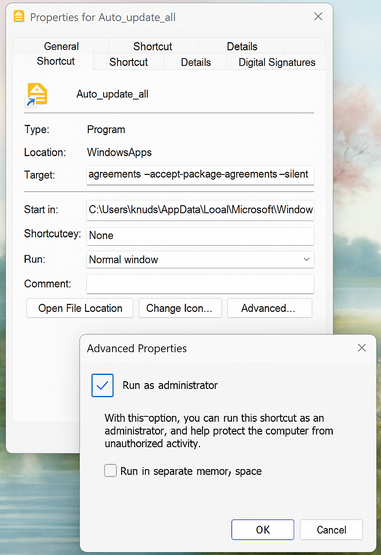
I’ve created a shortcut on my desktop that automatically updates everything silently:

C:\Users\knuds\AppData\Local\Microsoft\WindowsApps\winget.exe upgrade --all --accept-source-agreements --accept-package-agreements --silent

🔒 I run the shortcut as administrator, so it installs updates without asking for permission.

Here’s how it looks:
My shortcut and settings


Exclude programs from updating – like Microsoft Office Enterprise

If your company manages software like Microsoft Office, you don’t want winget to update it. Luckily, you can “pin” apps to prevent updates.

📌 To pin (lock) Office so it won’t update:

winget pin add --id Microsoft.Office

🔓 To unpin (unlock) it again:

winget pin remove --id Microsoft.Office

To see all pinned apps:

winget pin list

Final Tips

✅ Run Windows Update regularly
✅ Use winget upgrade --all to keep your apps secure
✅ Use pinning to protect company-managed software

With this simple shortcut and a few commands, you’ll keep your system secure and fully up to date – with no effort.

You can also use winget to install programs ;O)


Running Windows 11 in Docker on a ZimaBoard

Recently, I explored a fascinating way to run Windows 11 directly within a Docker container on my ZimaBoard. This setup uses the dockurr/windows Docker image, which makes it surprisingly simple to virtualize a full version of Windows for testing purposes.

Setting Up Windows 11 on Docker

To set up Windows 11 in Docker, you will need to create a docker-compose.yml file with the following configuration:

services:
  windows:
    image: dockurr/windows
    container_name: windows
    environment:
      VERSION: "11"
    devices:
      - /dev/kvm
      - /dev/net/tun
    cap_add:
      - NET_ADMIN
    ports:
      - 8006:8006
      - 3389:3389/tcp
      - 3389:3389/udp
    volumes:
      - /data/windows11_data:/storage
    stop_grace_period: 2m

Key Steps to Prepare:

  1. Create the Storage Folder: mkdir -p /data/windows11_data
  2. Deploy the Container: docker-compose up -d

This setup will pull the Windows 11 ISO directly from Microsoft servers and begin the installation within the container.

Versions Available

You can specify different versions by changing the VERSION parameter in the docker-compose.yml file. Here are the available versions:

  • 11 – Windows 11 Pro (5.4 GB)
  • 11l – Windows 11 LTSC (4.2 GB)
  • 11e – Windows 11 Enterprise (5.8 GB)
  • 10 – Windows 10 Pro (5.7 GB)
  • 10l – Windows 10 LTSC (4.6 GB)
  • 10e – Windows 10 Enterprise (5.2 GB)
  • And many more, including Windows Server versions.

Accessing Windows 11 in the Browser

You can view and interact with the Windows 11 installation in a web browser using the following link:

http://192.168.0.215:8006/?resize=scale&reconnect=true&autoconnect=true

Alternatively, you can use Remote Desktop (mstsc) to connect to the container via port 3389.

Persistent Storage and Licensing

  • Storage: The /data/windows11_data volume ensures persistent storage, meaning you can install software and perform tests.
  • License: A valid Windows license key is still required for activation.

Important Note About Updates

The Windows installation is based on an ISO downloaded during the initial setup. Therefore, updating the container image itself will not update Windows. To receive the latest version, you would need to delete the persistent storage and reinstall the container.


My Experience and Recommendation

I tested this setup on my ZimaBoard, and while it worked, the performance was limited due to the hardware constraints. For a smoother experience, I recommend running Windows 11 on a more powerful Proxmox server with direct virtualization support.

This method of running Windows in Docker provides an interesting alternative for temporary tests, development environments, and isolated Windows instances. It’s great to see how flexible Docker has become, even for complex operating systems like Windows.

Stay tuned for more experiments and technical insights on my homepage!


Exploring New Horizons: My Transition from Windows 11 to Debian 12 with KDE

In a world dominated by mainstream operating systems and tech giants, it’s refreshing to take a path less traveled. That’s precisely what I did when I decided to leave behind Windows 11 on my laptop and embrace Debian 12 with KDE. This shift was driven by my desire for control, customization, and a touch of curiosity.

Why Debian Over Windows?

  • Autonomy Over Updates: One of my biggest gripes with Windows was its intrusive update system. It seemed like Windows would force restarts at the most inconvenient times, disrupting my workflow. With Debian, I control when updates happen, ensuring they only occur when it’s suitable for me.
  • Privacy Concerns: The increasing integration of cloud services and data collection by big tech companies made me uncomfortable. I was not fond of my data residing in the cloud or being a part of an ecosystem that felt more like a trap than a service.
  • Customization Freedom: KDE on Debian offers an unparalleled level of customization. I can tailor the menus, desktop, and overall interface to match my preferences, making my computing experience genuinely personal.

Embracing the Linux Ecosystem

  • Compatibility Solutions: With tools like Vulkan, Wine, and Steam, I can run almost everything I need on Debian. For software that isn’t currently compatible, I’ve taken a proactive approach by reaching out to companies to request Linux versions of their products.
  • Challenging the Norm: It’s easy to stay comfortable with what’s familiar, but where’s the fun in that? Switching to Linux has reinvigorated my relationship with technology. It’s about learning new skills, solving puzzles when installation issues arise, and genuinely enjoying the process of making my operating system work for me.
  • Performance Considerations: Windows 11 and the upcoming Windows 12 demand increasingly newer hardware, which is not always feasible or desirable. Debian runs smoothly on a wide range of hardware, including older models that might struggle with newer Windows versions.

Conclusion

This journey isn’t just about ditching one operating system for another; it’s about reclaiming the tech space as my own, where I set the rules and boundaries. While Linux isn’t perfect, it’s a step away from the monotony of mainstream operating systems and a step towards something that feels exciting and new. For those tired of the same old routine, maybe it’s time to consider what Debian—or any Linux distribution—can offer you.


Installing Windows 11 on Unsupported Devices: A Step-by-Step Guide

Introduction
Windows 11 has brought a wave of new features and a sleek design, but its system requirements have left many users with older devices wondering if they can experience the latest OS. Fortunately, there’s a workaround to install Windows 11 on unsupported hardware, but it comes with risks. Let’s dive into how you can do this.

Step 1: Back Up Your Data
Before attempting any system modifications, it’s crucial to back up your important files. This ensures your data remains safe in case anything goes awry.

Step 2: Accessing the Registry Editor
To start, you’ll need to access the Windows Registry, a powerful tool that stores system settings. Press Windows + R, type regedit, and hit Enter. This opens the Registry Editor.

Step 3: Making the Change
In the Registry Editor, navigate to HKEY_LOCAL_MACHINE\SYSTEM\Setup\MoSetup. Here, create a new DWORD (32-bit) Value, naming it AllowUpgradesWithUnsupportedTPMOrCPU. Set its value to 1. This tells Windows to bypass the usual checks for TPM 2.0 and specific CPU models.

Step 4: Install Windows 11
After making this registry change and restarting your computer, you should be able to install Windows 11. This can be done either through Windows Update or by using Windows 11 installation media.

Important Considerations
While this method opens up the possibility of running Windows 11 on older hardware, it’s not without risks:

  • Compatibility Issues: Your device might encounter driver or hardware compatibility issues.
  • Lack of Support: Microsoft does not officially support Windows 11 on such devices, which could affect future updates and security support.
  • System Stability: Bypassing system requirements can lead to an unstable system.

Conclusion
Installing Windows 11 on an unsupported device is possible, but it’s essential to proceed with caution. This method is best suited for tech enthusiasts who are willing to take the risk. Remember, staying informed and prepared is key to any software modification.


Stay updated with the latest tech tips by following our blog. For more detailed information and tech support, always refer to trusted sources and official documentation.


How to Repair Windows 10 with SFC and DISM: A Quick Guide


Introduction:
Encountering system issues in Windows 10 can be a frustrating experience, but fear not! The built-in tools System File Checker (SFC) and Deployment Image Servicing and Management (DISM) are your allies in maintaining system integrity and performance. In this quick guide, we’ll walk you through the simple steps of using these tools to repair Windows 10.

Body:

Step 1: Launch Command Prompt as Administrator
First things first, you need to run the command prompt with administrative privileges. Right-click on the Start button and choose “Command Prompt (Admin)” or “Windows PowerShell (Admin)”.

Step 2: Use DISM Tool
Type and enter the following command:

DISM.exe /Online /Cleanup-image /Restorehealth

This process might take a while, as DISM downloads fresh copies of corrupted files from the internet.

Step 3: Run the SFC Tool
After DISM finishes, it’s time for the SFC tool. Type:

sfc /scannow

and hit Enter. SFC will now scan and fix any corrupted or missing system files.

Step 4: Restart Your Computer
Once done, a simple restart is needed for the changes to take effect.

Step 5: Check for Updates
Lastly, ensure your Windows 10 is up-to-date by checking for any pending updates.

Conclusion:
Using SFC and DISM is a straightforward way to deal with many common Windows 10 system issues. Regular use of these tools can help keep your system running smoothly and prevent future problems. Remember, an ounce of prevention is worth a pound of cure!

Additional Tips:

  • Keep your internet connection active during the process.
  • Be patient as the tools can take time to complete their tasks.
  • Regularly back up important data to avoid any accidental loss during system repairs.

Closing:
Stay tuned for more tips and tricks to keep your Windows 10 in top shape!


How to Upgrade to Windows 11 Using DISM: A Tech-Savvy Approach

Are you considering upgrading to Windows 11 but looking for an alternative to the standard update methods? The Deployment Image Servicing and Management (DISM) tool offers a more technical route, which might be perfect for advanced users and IT professionals. Here’s a concise guide on how to use DISM to upgrade to Windows 11.

Step 1: Get the Windows 11 ISO
Start by downloading the official Windows 11 ISO file from Microsoft’s website. This file contains the installation data needed for the upgrade.

Step 2: Mount the ISO
Once downloaded, right-click on the ISO file and select “Mount”. This creates a virtual drive, simulating a physical disc in your computer.

Step 3: Open Command Prompt as Administrator
To run DISM, you need administrative privileges. Search for “Command Prompt” in the Start menu, right-click it, and choose “Run as administrator”.

Step 4: Apply the Image Using DISM
In the Command Prompt, input the following commands:

  1. Check and repair system health:
   DISM /Online /Cleanup-Image /RestoreHealth

  1. Locate the Windows image:
   DISM /Get-WimInfo /WimFile:<DriveLetter>:\sources\install.wim

  1. Apply the Windows 11 image:
   DISM /Online /Apply-Image /ImageFile:<DriveLetter>:\sources\install.esd /Index:1 /ApplyDir:<YourInstallPartition>:\

Replace <DriveLetter> with your mounted drive and <YourInstallPartition> typically with C:.

Step 5: Complete the Upgrade
After the DISM process completes, restart your computer. Follow any on-screen instructions to finalize the upgrade.

Important Notes:

  • Backup: Always back up important data before upgrading.
  • Compatibility: Ensure your device meets Windows 11 requirements.
  • Risks: Using DISM is complex and can cause system issues if done incorrectly.
  • Seek Help if Needed: If unsure, consult a professional.

Upgrading to Windows 11 using DISM is not for the faint-hearted but offers an interesting alternative for those who prefer a hands-on approach. Happy upgrading!


Maximizing Efficiency with WMIC: A Guide to Windows System Management

Windows Management Instrumentation Command-line (WMIC) is an unheralded hero in the Windows operating system, a powerful tool that simplifies system administration. Its ability to fetch detailed system information, manage processes, and automate tasks makes it indispensable for power users and IT professionals. Let’s explore 20 essential WMIC commands that can transform your interaction with Windows.

  1. Understanding Your System: wmic os get caption,cstype,version provides a quick snapshot of your operating system, helping you understand the environment you’re working with.
  2. Software Inventory Made Easy: Keep track of installed applications effortlessly using wmic product get name,version.
  3. CPU at a Glance: Determine the capabilities of your CPU with wmic cpu get name,numberofcores,numberoflogicalprocessors.
  4. System Uptime Tracking: wmic os get lastbootuptime offers insights into system reliability and maintenance schedules.
  5. Managing User Accounts: wmic useraccount get name,sid is a quick way to list user accounts, enhancing user management.
  6. BIOS Details: Secure and update your system effectively by using wmic bios get serialnumber to get BIOS information.
  7. Disk Drive Analysis: wmic diskdrive get name,size,model helps in assessing storage capacities and performance.
  8. Memory Check: Evaluate your system’s memory capacity with wmic memorychip get capacity.
  9. Process Management: wmic process list brief offers a concise view of running processes, aiding in resource management.
  10. Network Configuration Overview: Use wmic nicconfig get ipaddress,macaddress for a quick network adapter review.
  11. Process Termination: Efficiently kill processes using wmic process where processid="ID" delete.
  12. Motherboard Information: Troubleshoot and upgrade your system with wmic baseboard get product,Manufacturer,version,serialnumber.
  13. Hotfixes Tracking: Stay updated on system patches using wmic qfe get hotfixid.
  14. Audit Logon Sessions: wmic netlogin get name,lastlogon,badpasswordcount is essential for security audits.
  15. Startup Management: wmic startup get caption,command helps optimize boot times.
  16. Environment Variables: Customize your system environment with wmic environment get description, variablevalue.
  17. Service Monitoring: Keep a check on system services via wmic service get name,state.
  18. Hardware Serial Numbers: wmic path win32_physicalmedia get SerialNumber aids in asset management.
  19. User Session Information: Quickly view active user sessions with wmic computersystem get username.
  20. Software Uninstallation: wmic product where "name like '%SoftwareName%'" call uninstall simplifies software removal.

WMIC is a window into the inner workings of your Windows system, offering control and insight with simplicity. Whether you’re an IT professional or an avid Windows user, mastering these commands can significantly enhance your efficiency and understanding of the system. As with any powerful tool, use WMIC judiciously, and explore its capabilities to fully harness its potential.


How to Read LDAP Data with Python

LDAP (Lightweight Directory Access Protocol) is a protocol used for accessing and managing directory services data, such as user information. Python provides several libraries for interacting with LDAP servers, and one popular choice is the ldap3 library. In this blog post, we’ll explore how to use Python to read LDAP data and save it to an Excel file using the ldap3 library.

Prerequisites

Before we begin, make sure you have the following prerequisites in place:

  • Python installed on your system.
  • The ldap3 library installed. You can install it using pip:
pip install ldap3

  • The openpyxl library installed for working with Excel files:
pip install openpyxl

Reading LDAP Data with Python

We’ll demonstrate how to read LDAP data and save it to an Excel file using Python. Below is a Python script that accomplishes this task:

from ldap3 import Server, Connection
from openpyxl import Workbook

def Ldap(OuUser, LdapUser, Filename):
    # Create a connection to the LDAP server
    server = Server('mydomain.com')
    conn = Connection(server, authentication="SIMPLE", user="user@mail.com", password="Password")
    conn.bind()

    # Search for LDAP entries based on the provided filter
    result = conn.search(search_base=OuUser, search_filter='(objectClass=user)', attributes=LdapUser)

    # Create a new Excel workbook and worksheet
    wb = Workbook()
    ws = wb.active
    ws.append(LdapUser)

    # Iterate through LDAP entries and retrieve desired attributes
    for entry in conn.entries:
        attributes_values = []
        for attribute in LdapUser:
            if attribute in entry:
                attributes_values.append(entry[attribute].value)
            else:
                attributes_values.append(None)
        ws.append(attributes_values)

    # Save the Excel workbook
    wb.save(Filename)

    # Unbind the LDAP connection
    conn.unbind()

# Define the LDAP user attributes and search base
LdapUser = ['sAMAccountName', 'title', 'givenName', 'sn', 'company', 'department', 'streetAddress', 'postalCode', 'l', 'co', 'telephoneNumber', 'mobile', 'mail', 'extensionAttribute11', 'manager']
OuUser = 'ou=users,ou=accounts,ou=test,dc=mydomain,dc=com'

# Call the Ldap function to retrieve user data and save it to an Excel file
Ldap(OuUser, LdapUser, "c:\\python\\ldap\\ldap_user.xlsx")

# Define the LDAP computer attributes and search base
LdapComputer = ['sAMAccountName', 'title', 'cn', 'description', 'managedBy', 'operatingSystem', 'operatingSystemVersion']
OuComputer = 'ou=mobile,ou=computers,ou=test,dc=mydomain,dc=com'

# Call the Ldap function to retrieve computer data and save it to an Excel file
Ldap(OuComputer, LdapComputer, "c:\\python\\ldap\\ldap_mobile.xlsx")

Understanding the Code

  1. Import necessary libraries: We import the Server, Connection class from ldap3 and the Workbook class from openpyxl.
  2. Create an LDAP connection: We create a connection to the LDAP server with the provided credentials.
  3. Search for LDAP entries: We use the search method to query LDAP entries based on the provided search filter and attributes.
  4. Create an Excel workbook and worksheet: We initialize an Excel workbook and add a worksheet to it.
  5. Iterate through LDAP entries: We loop through the LDAP entries and retrieve the desired attributes. If an attribute is missing in an entry, we append None to the Excel sheet.
  6. Save the Excel workbook: We save the workbook to the specified file location.
  7. Unbind the LDAP connection: We disconnect from the LDAP server when we are done.

Conclusion

In this blog post, we’ve demonstrated how to read LDAP data with Python using the ldap3 library and save it to an Excel file. This can be a useful technique for managing and analyzing directory services data efficiently.


How to Compile Python Programs in Windows

Compiling your Python programs into standalone executables can be incredibly useful, especially when you want to distribute your software to others who may not have Python installed. In this blog post, we’ll walk you through the process of compiling Python programs on a Windows system using PyInstaller.

What is PyInstaller?

PyInstaller is a popular open-source tool that converts Python scripts into standalone executables. It bundles your Python interpreter and all required libraries into a single executable file, making it easy to distribute your Python applications without worrying about dependencies.

Prerequisites

Before you start, make sure you have Python and PyInstaller installed on your Windows machine. You can download and install Python from the official website (https://www.python.org/downloads/), and then install PyInstaller using pip:

pip install pyinstaller

Compiling Your Python Program

Now that you have PyInstaller installed, follow these steps to compile your Python program:

1. Open Command Prompt

Press Win + R, type cmd, and press Enter to open the Command Prompt.

2. Navigate to Your Project Directory

Use the cd command to navigate to the directory where your Python script is located. For example:

cd C:\Python\Find_file

3. Compile Your Python Script

Run the PyInstaller command to compile your Python script. In your case, the command might look like this:

pyinstaller --windowed --icon=findfile.ico --add-data "findfile.ico;." find_file.py -n find-file --onefile --noconsole --noconfirm

  • --windowed: This flag indicates that your program should run in a graphical window (GUI).
  • --icon=findfile.ico: Specifies the icon file for your executable.
  • --add-data "findfile.ico;.": Tells PyInstaller to include the findfile.ico file in the executable.
  • find_file.py: The name of your Python script.
  • -n find-file: Specifies the name of the output executable.
  • --onefile: This option bundles everything into a single executable file.
  • --noconsole: Hides the console window when running the executable.
  • --noconfirm: Prevents PyInstaller from asking for confirmation during the build process.

4. Cleanup

After compiling, you can clean up the unnecessary files generated by PyInstaller:

del find-file.spec
rmdir /S /Q build
copy dist\*.exe .
rmdir /S /Q dist

  • del find-file.spec: Deletes the PyInstaller spec file.
  • rmdir /S /Q build: Removes the build directory.
  • copy dist\*.exe .: Copies the generated executable(s) to your current directory.
  • rmdir /S /Q dist: Deletes the dist directory.

Conclusion

Compiling Python programs on Windows with PyInstaller is a straightforward process. Once you’ve followed these steps, you’ll have a standalone executable that can be easily shared with others, making your Python applications more accessible and portable.