Setting Up DNS Resolver (Unbound) in pfSense to Use Quad9

Introduction:
In today’s digital landscape, having a robust and secure DNS resolver is essential for ensuring a smooth and safe browsing experience. One popular option is Quad9, a DNS service that emphasizes privacy and security. In this guide, we will walk you through the process of setting up the DNS Resolver (Unbound) in pfSense to use Quad9 for your DNS queries.

Menu System – General Setup

  1. Access General Setup:
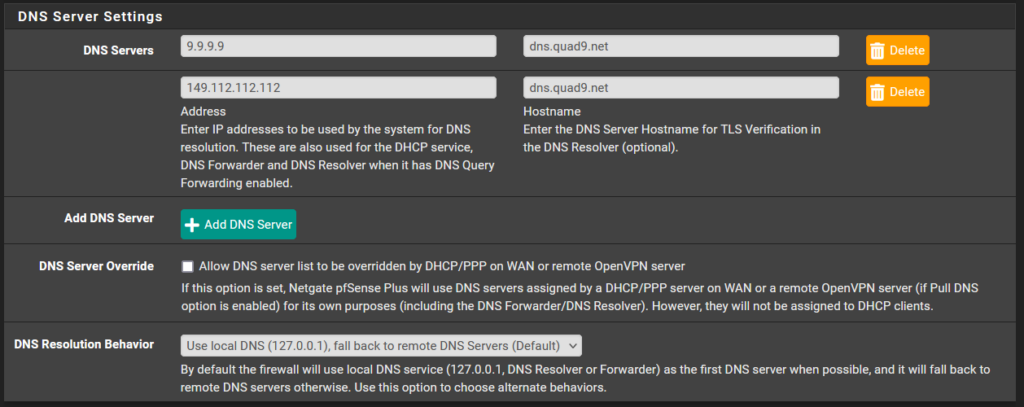
    Log in to your pfSense web interface and navigate to System > General Setup.
  2. Update Primary DNS Server:
    In the “DNS Server Settings” section, locate the primary DNS server. Change the IP address to 9.9.9.9 and set the hostname to dns.quad9.net.
  3. Configure Secondary DNS Server:
    For the secondary DNS server, set the IP address to 149.112.112.112 and the hostname to dns.quad9.net.
  4. DNS Resolution Behavior:
    Ensure that the “DNS resolution Behavior” is set to Use local DNS, fall back to remote DNS servers (default).
  5. IPv6 Configuration (Optional):
    If you’re not using IPv6, you can skip the IPv6 configuration settings in the General Setup.

Menu Services – DNS Resolver – General Settings

  1. Enable DNS Resolver:
    Go to Services > DNS Resolver and ensure that the Enable checkbox is selected.
  2. SSL/TLS Certificate:
    Keep the default SSL/TLS Certificate setting, as it is set to the webConfigurator default.
  3. Network Interfaces:
    Under “Network Interfaces,” select All to allow DNS resolution on all available interfaces.
  4. Outgoing Network Interfaces:
    Choose WAN as the outgoing network interface for DNS queries.
  5. System Domain Local Zone Type:
    Set the “System Domain Local Zone Type” to Transparent.
  6. DNSSEC Configuration:
    Since Quad9 already uses DNSSEC, you don’t need to enable DNSSEC in the pfSense settings.
  7. Enable Forwarding Mode:
    Make sure that “Enable Forwarding Mode” is enabled. This allows Unbound to forward DNS queries to external DNS servers like Quad9.
  8. SSL/TLS for Outgoing DNS Queries:
    Enable the “Use SSL/TLS for outgoing DNS Queries to Forwarding Servers” option. This ensures encrypted communication between pfSense and Quad9.

Conclusion:

Setting up the DNS Resolver (Unbound) in pfSense to use Quad9 is a straightforward process that enhances your network’s security and privacy. By following the steps outlined in this guide, you’ve configured your pfSense firewall to route DNS queries through Quad9’s secure and reliable servers. With a strong emphasis on protecting user data and thwarting malicious activities, Quad9 ensures a safer online experience for you and your network users. Now you can enjoy faster, more secure, and private browsing while benefiting from the robust capabilities of pfSense and Quad9.

Remember, the digital landscape is constantly evolving, and staying proactive about your network’s security is paramount. Periodically revisit your DNS resolver settings and consider exploring other security-enhancing features within pfSense to ensure your network remains protected.


Safeguarding Your Digital Oasis: The Importance of Network Segmentation and Robust Security

Title: Safeguarding Your Digital Oasis: The Importance of Network Segmentation and Robust Security

Introduction

In our interconnected world, the proliferation of Internet of Things (IoT) devices and the need for guest access has become increasingly common. However, the convenience comes with potential security risks that should not be ignored. In this blog post, we will emphasize the critical importance of separating IoT devices from your private network, implementing robust security measures, and maintaining up-to-date systems to create a secure digital oasis for your home or business.

  1. The Significance of Network Segmentation

Isolating IoT devices from your private network is a fundamental security practice. IoT devices often have vulnerabilities, and if compromised, they can become a gateway for hackers to access your personal data and network. By creating a separate network for these devices, you mitigate the risk of unauthorized access and protect your sensitive information.

  1. Implementing Robust Security Measures

Having a strong and well-configured firewall is paramount to safeguarding your network. A firewall acts as a gatekeeper, monitoring and controlling incoming and outgoing traffic, preventing malicious entities from gaining entry to your network. Additionally, utilizing intrusion detection and prevention systems (IDPS) adds an extra layer of security, alerting you to potential threats in real-time.

  1. Securing Guest Access

Offering guest Wi-Fi access is a common courtesy, but it should never jeopardize your private network’s security. It is essential to create a separate guest network with strong encryption and a unique password. Restricting guest access to the internet only ensures that their devices are isolated from your private network, safeguarding your data and devices from unauthorized access.

  1. Keeping Systems Up-to-Date

Maintaining regular updates for your computers, router, and firewall is a crucial practice in network security. Software developers frequently release updates to address security vulnerabilities and enhance performance. By staying current with these updates, you minimize the risk of potential exploits and ensure your network remains robust against emerging threats.

  1. Strengthening Wi-Fi Security

Securing your Wi-Fi access point is vital to prevent unauthorized access to your network. Enable WPA3 encryption, which offers the highest level of Wi-Fi security available, and use a strong, unique password that combines uppercase and lowercase letters, numbers, and special characters. Regularly change your Wi-Fi password to further enhance security.

  1. Guest Network Isolation

To ensure guest privacy and protect your network from any misconfigurations, enable client isolation on your guest network. This feature prevents devices connected to the guest network from communicating with each other, limiting their access to the internet only.

Conclusion

As technology becomes an integral part of our lives, ensuring the security of our networks is of utmost importance. By implementing network segmentation to separate IoT devices from the private network, creating strong security measures with up-to-date systems, and securing guest access, you create a fortress of protection for your digital oasis.

Remember, safeguarding your network is an ongoing process. Continuously update your systems, maintain robust security measures, and educate yourself on emerging threats. With these practices in place, you can confidently enjoy the benefits of technology while protecting your personal data and ensuring a safe digital environment for yourself and your guests.


Installing Searxng on ARM64 Architecture with Docker

Introduction:
Searxng is a privacy-friendly and open-source metasearch engine that aggregates search results from various sources. In this guide, we’ll walk you through the process of installing Searxng on an ARM64 architecture using Docker, allowing you to set up your own search engine.

Step 1: Install Searxng with Docker

To install Searxng and run it in Docker on ARM64, execute the following command:

docker run -d -p 8888:8080 \
  --name=searxng \
  -v "searxng_data:/etc/searx" \
  -v "searxng_data:/etc/searxng" \
  -e "BASE_URL=http://192.168.0.224:8888" \
  -e "INSTANCE_NAME=searxng" \
  searxng/searxng:latest

Explanation of options used:

  • -d: Run the container in the background (detached mode).
  • -p 8888:8080: Map port 8080 from the container to port 8888 on the host system. This allows you to access Searxng’s web interface at http://localhost:8888.
  • --name=searxng: Assign the name “searxng” to the container for easy management.
  • -v "searxng_data:/etc/searx": Create a Docker volume named “searxng_data” and mount it to the “/etc/searx” directory inside the container. This volume allows you to persist Searxng’s data and configurations.
  • -e "BASE_URL=http://192.168.0.224:8888": Set the base URL for the Searxng instance. Replace “192.168.0.224” with the IP address or domain name of your server.
  • -e "INSTANCE_NAME=searxng": Specify a custom name for the Searxng instance.

Step 2: Access Searxng Web Interface

Once the Searxng container is up and running, open a web browser and navigate to http://localhost:8888. You will be directed to Searxng’s web interface, where you can perform searches and explore the search engine’s features.

Conclusion:
By following these steps and using Docker, you have successfully installed Searxng on an ARM64 architecture. You now have your own private search engine, Searxng, up and running, allowing you to search the web with enhanced privacy and control.

Enjoy the benefits of Searxng and have fun searching! Happy exploring!


Setting Up Pi-hole with Docker for Network-Wide Ad Blocking

Introduction:
Pi-hole is a popular network-level ad blocker that helps you block advertisements at the DNS level. With Docker, you can easily deploy Pi-hole on your network for ad-free browsing on all your connected devices. In this guide, we’ll walk you through the process of setting up Pi-hole using Docker.

Step 1: Install Pi-hole with Docker

To install Pi-hole and run it in Docker, execute the following command:

docker run -d --name=pihole \
  -e TZ=Europe/Copenhagen \
  -e WEBPASSWORD=xxxxxxx \
  -e SERVERIP=192.168.0.224 \
  -e FTLCONF_LOCAL_IPV4=192.168.0.227 \
  -v pihole_data:/etc/pihole \
  -v pihole_dnsmasq:/etc/dnsmasq.d \
  -p 81:80 \
  -p 53:53/tcp \
  -p 53:53/udp \
  --net=host \
  --restart=unless-stopped \
  pihole/pihole:latest

Explanation of options used:

  • -d: Run the container in the background (detached mode).
  • --name=pihole: Assign the name “pihole” to the container for easy management.
  • -e TZ=Europe/Copenhagen: Set the timezone to “Europe/Copenhagen” inside the container.
  • -e WEBPASSWORD=xxxxxxx: Set a custom web admin password for Pi-hole. Replace “xxxxxxx” with your desired password.
  • -e SERVERIP=192.168.0.224: Set the IP address of the Docker host (Raspberry Pi) where Pi-hole will run. Replace “192.168.0.224” with your Raspberry Pi’s IP address.
  • -v pihole_data:/etc/pihole: Create a Docker volume named “pihole_data” and mount it to the “/etc/pihole” directory inside the container. This volume allows you to persist Pi-hole’s data and configurations.
  • -v pihole_dnsmasq:/etc/dnsmasq.d: Create a Docker volume named “pihole_dnsmasq” and mount it to the “/etc/dnsmasq.d” directory inside the container. This volume is used to customize DNS settings and blocklists.
  • -p 81:80: Map port 80 from the container to port 81 on the host system. This allows you to access Pi-hole’s web interface at http://localhost:81.
  • -p 53:53/tcp -p 53:53/udp: Map port 53 from the container to both TCP and UDP port 53 on the host system. This enables Pi-hole to handle DNS requests. Or “–net=host \” for local network install.
  • --restart=unless-stopped: Configure the container to automatically restart if it stops unexpectedly.
  • pihole/pihole:v5.6: Specifies the Docker image to use for running Pi-hole (version 5.6).

Step 2: Access Pi-hole Web Interface

Once the Pi-hole container is up and running, open a web browser and navigate to http://localhost:81. You will be directed to Pi-hole’s web interface. Use the custom web admin password you set in the Docker command to log in.

Congratulations! You have successfully deployed Pi-hole on your network using Docker. Your network devices will now benefit from network-wide ad blocking, providing a seamless and ad-free browsing experience.

Remember to configure your devices to use your Raspberry Pi’s IP address (192.168.0.224) as the DNS server to take advantage of Pi-hole’s ad-blocking capabilities.

Enjoy ad-free browsing and network-level ad blocking with Pi-hole and Docker! Happy browsing!