Exciting Announcement: New Kubernetes Cluster on Raspberry Pi

I’m thrilled to announce the successful installation of a brand-new Kubernetes cluster on four Raspberry Pi devices! This project, utilizing Bookworm, Ansible, and NFS, showcases the potential of combining powerful software tools with the versatility of Raspberry Pi hardware.

Project Details

Hardware Setup:

  • Devices: 4 Raspberry Pi 4 units
  • Storage: M.2 256GB USB drives (superior to traditional SD cards for reliability and speed)
  • Networking: A small network switch for robust cabled connections

Software Stack:

  • Operating System: Raspberry Pi OS 64-bit Lite (Bookworm)
  • Automation: Ansible for automated and consistent setup
  • Storage: NFS for shared, reliable storage

Installation Overview

The installation process is impressively quick and efficient, taking about 30 minutes from start to finish:

  • 15 minutes: Installing the OS and necessary dependencies using Ansible
  • 15 minutes: Setting up Kubernetes with one master and three nodes, including auto-provisioned storage via NFS

Services Deployed

As part of this new installation, several key services have already been deployed on the cluster using kubectl:

  • Portainer: For managing Kubernetes environments
  • NetAlert: For network monitoring
  • Prometheus and Grafana: For monitoring and visualization
  • Minecraft Server: For gaming and experimentation
  • Homepage Dashboard: For a personalized user interface
  • Searxng: For metasearch engine capabilities

What’s Next?

In the coming days, I will be posting detailed guides and Ansible scripts for setting up these services on my homepage. These resources will include step-by-step instructions to help you replicate this setup and customize it for your own needs.

Stay tuned for more updates and detailed tutorials on my homepage. This new installation demonstrates the impressive capabilities of Kubernetes on Raspberry Pi, and I’m excited to share more about this journey with you.

Thank you for your interest, and look forward to the upcoming posts with detailed guides and scripts!



pfSense+ ver. 24.09: Recovering from a Firmware Upgrade Mishap on My Netgate SG-1100

Upgrading the firmware of a device usually promises enhancements and bug fixes, but it can sometimes lead to unexpected complications, as was the case with my recent experience upgrading my Netgate SG-1100 from version 23.09 to 24.03. Typically, a firmware upgrade takes around 15-20 minutes, during which I ensured I had a backup in place, following best practices.

However, this time around, the upgrade did not go as planned, and I found myself reaching for my serial cable, downloading balenaEtcher and PuTTY, and preparing for a manual recovery. I reached out to Netgate support, who guided me through the process of downloading the latest firmware. The process was straightforward: log into the Netgate store, add the firmware to your cart, and download it at no additional cost.

Using balenaEtcher, I wrote the firmware image to a USB stick, then connected it to my device. With my serial cable attached and PuTTY configured (COM3, 115200 speed, 8 data bits, 1 stop bit, no parity, and no flow control).
I followed the detailed installation instructions provided by Netgate, which are available here.

During this ordeal, I was grateful for my backup Internet solutions, including a home fiber connection and mobile Internet. I had a secondary router ready—a Zimaboard running pfSense Community Edition—which not only got me back online quickly but also, surprisingly, performed faster than the SG-1100.

This experience reinforced the value of having a backup router and the practicality of using pfSense Community Edition for personal use. For businesses, however, I would still recommend investing in a Netgate device with the Plus version for additional support.

Once I resolved the initial issues, restored my settings, and confirmed everything was operational, I decided to keep the Netgate SG-1100 as a backup device while continuing to use my Zimaboard. This incident highlighted a compatibility issue with pfBlockerNG-devel and the new firmware on the small Netgate SG-1100, which was resolved by switching back to the stable version of pfBlockerNG.

Always having a backup plan and knowing how to manually recover your device’s firmware are invaluable, as Internet connectivity is crucial in today’s world. The ability to troubleshoot and restore functionality with minimal downtime is not just convenient; it is essential.

Knud ;O)


Enhancing Your Network Security with pfBlockerNG-devel: A Quick Guide

I recently upgraded to pfSense Plus 24.03 and initially hoped to see improvements with pfBlockerNG-devel. However, it appears that pfBlockerNG-devel is facing stability issues in this version. On the other hand, the standard pfBlockerNG seems to be functioning more stably. If you’re encountering similar issues with pfBlockerNG-devel, it might be worth switching back to the stable version of pfBlockerNG until further updates address these concerns.

Are you concerned about the security of your home network? Worried about malicious websites, ads, and unwanted content infiltrating your online experience? Look no further than pfBlockerNG-devel, a powerful package for pfSense that allows you to take control of your network’s security by implementing various blocking mechanisms. In this guide, we’ll walk you through the installation and key configuration steps to get the most out of pfBlockerNG-devel without overwhelming you with technical details.

Installation

To get started, open up your pfSense dashboard and navigate to the System Package Manager. Here, you’ll find a list of available packages. Search for “pfBlockerNG-devel” and install it. Once the installation is complete, you’ll be guided through a wizard that will assist you in setting up pfBlockerNG.

Initial Configuration

After installation, ensure that you enable “floating rules” and “kill states.” These settings are important for the proper functioning of pfBlockerNG.

GeoIP Blocking

One powerful feature of pfBlockerNG-devel is the ability to block traffic based on geographical locations. If there are countries you prefer not to have contact with, you can easily set up inbound blocking rules for them. This adds an extra layer of security to your network.

DNSBL (DNS Blocking)

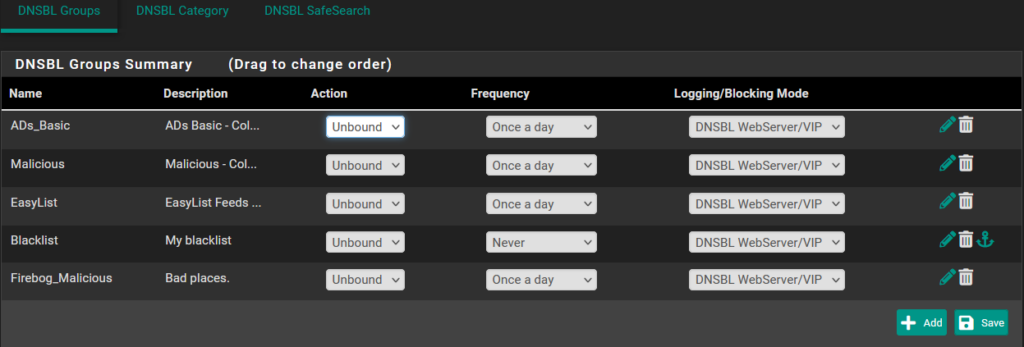
DNSBL, or DNS Blocking, is an essential tool to prevent access to malicious, ads, and unwanted websites. pfBlockerNG-devel supports this feature by allowing you to add various blacklists. However, it’s important not to go overboard, as blocking too much might hinder your internet usage. Consider enabling lists like “ads_basic,” “malicious,” “easylist,” and “firebog_malicious” under DNSBL groups.

Moreover, the “shalalist” category offers site-blocking options for aggressive, cost traps, drugs, finance, gambling, and spyware-related websites. The “ut1” category includes aggressive, dangerous sites, DDOS, drugs, gambling, malware, phishing, sects, and cheater-related sites. Be selective in your choices to maintain optimal internet usability.

IP Blocking

In the IP blocking section, you can prevent outbound traffic to specific IP addresses. This is useful for devices that may have IP addresses hardcoded in their software, bypassing your DNS. Prioritize blocking known malicious IPs by using the PRI1 and TOR deny outbound lists. Additionally, maintain a whitelist to permit outbound traffic to trusted IPs.

Regular Updates

Remember, changes you make within pfBlockerNG-devel need an update to take effect. Go to “Firewall” and select “pfBlockerNG Update” to ensure your settings are current.

DNS Provider and Security

For enhanced security, consider configuring your external DNS provider. One recommended option is Quad9, known for its comprehensive blocklists and secondary DNS service. Quad9 not only blocks potentially harmful sites but also secures your DNS requests against potential fakes. This extra layer of protection prevents malicious actors from redirecting you to counterfeit websites.

Conclusion

Enhancing your network security with pfBlockerNG-devel doesn’t have to be overwhelming. By following this quick guide, you can set up an effective security solution for your home network. Remember to strike a balance between protection and usability, and stay updated with the latest threat intelligence to keep your online experience safe and smooth.


Exploring New Horizons: My Transition from Windows 11 to Debian 12 with KDE

In a world dominated by mainstream operating systems and tech giants, it’s refreshing to take a path less traveled. That’s precisely what I did when I decided to leave behind Windows 11 on my laptop and embrace Debian 12 with KDE. This shift was driven by my desire for control, customization, and a touch of curiosity.

Why Debian Over Windows?

  • Autonomy Over Updates: One of my biggest gripes with Windows was its intrusive update system. It seemed like Windows would force restarts at the most inconvenient times, disrupting my workflow. With Debian, I control when updates happen, ensuring they only occur when it’s suitable for me.
  • Privacy Concerns: The increasing integration of cloud services and data collection by big tech companies made me uncomfortable. I was not fond of my data residing in the cloud or being a part of an ecosystem that felt more like a trap than a service.
  • Customization Freedom: KDE on Debian offers an unparalleled level of customization. I can tailor the menus, desktop, and overall interface to match my preferences, making my computing experience genuinely personal.

Embracing the Linux Ecosystem

  • Compatibility Solutions: With tools like Vulkan, Wine, and Steam, I can run almost everything I need on Debian. For software that isn’t currently compatible, I’ve taken a proactive approach by reaching out to companies to request Linux versions of their products.
  • Challenging the Norm: It’s easy to stay comfortable with what’s familiar, but where’s the fun in that? Switching to Linux has reinvigorated my relationship with technology. It’s about learning new skills, solving puzzles when installation issues arise, and genuinely enjoying the process of making my operating system work for me.
  • Performance Considerations: Windows 11 and the upcoming Windows 12 demand increasingly newer hardware, which is not always feasible or desirable. Debian runs smoothly on a wide range of hardware, including older models that might struggle with newer Windows versions.

Conclusion

This journey isn’t just about ditching one operating system for another; it’s about reclaiming the tech space as my own, where I set the rules and boundaries. While Linux isn’t perfect, it’s a step away from the monotony of mainstream operating systems and a step towards something that feels exciting and new. For those tired of the same old routine, maybe it’s time to consider what Debian—or any Linux distribution—can offer you.


Exploring the KEA DHCP Server in pfSense+ 23.09

Do not use KEA DHCP after 50 days, I got a lot of problems and my devices did not come on the internet and also not got the right IPs.
So I had to switch back to the old ISC DHCP again.

Warning – KEA DHCP is not working 100% in 23.09.1

With the release of pfSense+ 23.09, a significant transition in DHCP services is on the horizon. The move from the traditional ISC DHCP server to the modern KEA DHCP is not just a change; it’s an upgrade that brings several benefits and improvements.

Why Switch to KEA DHCP?

  1. Deprecated ISC DHCP: The ISC DHCP server is now deprecated, signaling a shift towards more advanced and supported solutions like KEA.
  2. Simple Transition Process: You can easily switch to KEA DHCP via System > Advanced > Networking in the pfSense+ interface. A simple toggle from ISC DHCP to KEA DHCP is all it takes, maintaining the simplicity of the process.
  3. No Reboot Required: Remarkably, switching to KEA DHCP doesn’t necessitate a system reboot. This feature ensures minimal disruption in network services.

Key Considerations for Migration

  1. Automatic Migration: pfSense+ is engineered to seamlessly migrate your existing DHCP settings to KEA DHCP, preserving configurations like IP ranges and reservations.
  2. Manual Verification: It’s prudent to manually check that all settings have correctly transferred and KEA DHCP operates as expected.
  3. Advanced Configurations: KEA DHCP offers more flexibility, which might necessitate some manual adjustments for complex configurations.
  4. Documentation and Community Support: Leverage pfSense documentation and forums for any migration challenges or questions.
  5. Backup Your Configuration: Always backup your current configuration before making significant changes like this.

Enhancements with KEA DHCP

KEA DHCP is not just a replacement but an enhancement. It offers:

  1. Unified Configuration: KEA integrates dynamic ranges and static mappings more cohesively.
  2. Static Mappings in Dynamic Range: Static mappings can now coexist within the dynamic range, optimizing address space utilization.
  3. Flexibility in Assignments: KEA allows dynamic and fixed address assignments within the same pool, offering greater flexibility.
  4. Improved Management and Performance: Expect easier management and better performance with KEA, along with advanced features suitable for complex networks.

Post-Migration Steps

After the migration:

  1. Monitor Service Status: Check Status > Dashboard to confirm KEA DHCP service is up and running.
  2. Adjust Watchdog Settings: Update your service watchdog to monitor KEA DHCP instead of the old ISC service.
  3. Review Notifications: Keep an eye on notifications for any alerts related to DHCP service.

In summary, the transition to KEA DHCP in pfSense+ 23.09 is a straightforward yet impactful change. It simplifies the DHCP management while offering improved performance and flexibility. Remember to verify settings post-migration and enjoy the new capabilities of your upgraded system!

Knud ;O)


Enhancing Docker Swarm Networking with Macvlan

In Docker Swarm, the inability to use the host network directly for stacks presents a challenge for seamless integration into your local LAN. This blog post explores a solution using Macvlan to address this limitation, enabling Docker Swarm stacks to communicate efficiently on your network. We’ll walk through the steps of reserving IP addresses, configuring Macvlan on each node, and deploying a service to utilize these networks.

Reserving IP Addresses in DHCP

For a Docker Swarm cluster, it’s crucial to reserve specific IP addresses within your network to prevent conflicts. Here’s how to approach this task:

  • Network Configuration: Assuming a network range of 192.168.0.0/24 with a gateway at 192.168.0.1.
  • DHCP Server Pool: The existing DHCP server managed by pfSense allocates addresses from 192.168.0.1 to 192.168.0.150.
  • Reserved Range for Docker Swarm: For Macvlan usage, the range from 192.168.0.180 to 192.168.0.204 is reserved, providing 4 addresses per node within a /30 subnet. This setup yields 2 usable IP addresses per node, with one address for the network identification and another for broadcasting.

Node Configuration Overview

Each node is allocated a /30 subnet, as detailed below:

  • Node 1: 192.168.0.180/30 – Usable IPs: 192.168.0.181, 192.168.0.182
  • Node 2: 192.168.0.184/30 – Usable IPs: 192.168.0.185, 192.168.0.186
  • Node 3: 192.168.0.188/30 – Usable IPs: 192.168.0.189, 192.168.0.190
  • Node 4: 192.168.0.192/30 – Usable IPs: 192.168.0.193, 192.168.0.194

Configuring Macvlan on Each Node

To avoid IP address conflicts, it’s essential to define the Macvlan configuration individually for each node:

  1. Create macvlanconfig_swarm in Portainer: For each node, set up a unique Macvlan configuration specifying the driver as Macvlan, the parent interface (e.g., eth0), and the subnet and gateway. Assign each node its /30 subnet range.
  2. Deploy Macvlan as a Service: After configuring each node, create a Macvlan network as a service within your Swarm. This step involves creating a network with the Macvlan driver and linking it to the macvlanconfig_swarm configuration from a manager node.

Deploying Services Using Macvlan

With Macvlan, services like Nginx can be deployed across the Docker Swarm without port redirection, ensuring each instance receives a unique IP address on the LAN. Here’s a Docker Compose example for deploying an Nginx service:

version: '3.8'
services:
  nginx:
    image: nginx:latest
    volumes:
      - type: volume
        source: nginx_data
        target: /usr/share/nginx/html
        volume:
          nocopy: true
    networks:
      - macvlan

volumes:
  nginx_data:
    driver: local
    driver_opts:
      type: nfs
      o: addr=192.168.0.220,nolock,soft,rw
      device: ":/data/nginx/data"

networks:
  macvlan:
    external: true
    name: "macvlan"

Scaling and Managing Services

As your Docker Swarm grows, each Nginx instance will have its distinct IP in the LAN. To manage these instances effectively, consider integrating an external load balancer. This setup allows for seamless distribution of incoming traffic across all Nginx instances, presenting them as a unified service.

Conclusion

Utilizing Macvlan within a Docker Swarm cluster provides a robust solution for direct LAN communication. By carefully reserving IP ranges and configuring each node with Macvlan, you can ensure efficient network operations. Remember, the deployment of services without port redirection requires careful planning, particularly when scaling, making an external load balancer an essential component of your architecture.


Installing Portainer in Docker Swarm: A Step-by-Step Guide

Portainer is an essential tool for managing your Docker environments, offering a simple yet powerful UI for handling containers, images, networks, and more. Integrating Portainer into your Docker Swarm enhances your cluster’s management, making it more efficient and user-friendly. Here’s a concise guide on installing Portainer within a Docker Swarm setup, leveraging the power of NFS for persistent data storage.

Prerequisites

  • A Docker Swarm cluster is already initialized.
  • NFS server is set up for persistent storage (in this case, at 192.168.0.220).

Step 1: Prepare the NFS Storage

Before proceeding with Portainer installation, ensure you have a dedicated NFS share for Portainer data:

  1. Create a directory on your NFS server (192.168.0.220) that will be used by Portainer: /data/portainer/data.
  2. Ensure this directory is exported and accessible by your Swarm nodes.

Step 2: Create the Portainer Service

The following Docker Compose file is designed for deployment in a Docker Swarm environment and utilizes NFS for storing Portainer’s data persistently.

version: '3.2'

services:
  agent:
    image: portainer/agent:latest
    volumes:
      - /var/run/docker.sock:/var/run/docker.sock
      - /var/lib/docker/volumes:/var/lib/docker/volumes
    networks:
      - agent_network
    deploy:
      mode: global
      placement:
        constraints: [node.platform.os == linux]

  portainer:
    image: portainer/portainer-ee:latest
    command: -H tcp://tasks.agent:9001 --tlsskipverify
    ports:
      - "9000:9000"
      - "8000:8000"
    volumes:
      - type: volume
        source: portainer_data
        target: /data
        volume:
          nocopy: true
    networks:
      - agent_network
    deploy:
      mode: replicated
      replicas: 1
      placement:
        constraints: [node.role == manager]

networks:
  agent_network:
    driver: overlay
    attachable: true

volumes:
  portainer_data:
    driver: local
    driver_opts:
      type: nfs
      o: addr=192.168.0.220,nolock,soft,rw
      device: ":/data/portainer/data"

Step 3: Deploy Portainer

To deploy Portainer, save the above configuration to a file named portainer-agent-stack.yml. Then, execute the following command on one of your Swarm manager nodes:

docker stack deploy -c portainer-agent-stack.yml portainer

This command deploys the Portainer server and its agent across the Swarm. The agent provides cluster-wide visibility to the Portainer server, enabling management of the entire Swarm from a single Portainer instance.

Step 4: Access Portainer

Once deployed, Portainer is accessible via http://<your-manager-node-ip>:9000. The initial login requires setting up an admin user and password. After logging in, you can connect Portainer to your Docker Swarm environment by selecting it from the home screen.

Conclusion

Integrating Portainer into your Docker Swarm setup provides a robust, web-based UI for managing your cluster’s resources. By leveraging NFS for persistent storage, you ensure that your Portainer configuration and data remain intact across reboots and redeployments, enhancing the resilience and flexibility of your Docker Swarm environment.


Docker Swarm Storage Options: Bind Mounts vs NFS Volume Mounts

When deploying services in a Docker Swarm environment, managing data persistence is crucial. Two common methods are bind mounts and NFS volume mounts. While both serve the purpose of persisting data outside containers, they differ in flexibility, scalability, and ease of management, especially in a clustered setup like Docker Swarm.

Bind Mounts directly link a file or directory on the host machine to a container. This method is straightforward but less flexible when scaling across multiple nodes in a Swarm, as it requires the exact path to exist on all nodes.

NFS Volume Mounts, on the other hand, leverage a Network File System (NFS) to share directories and files across a network. This approach is more scalable and flexible for Docker Swarm, as it allows any node in the swarm to access shared data, regardless of the physical location of the files.

Example: Deploying Nginx with Bind and NFS Volume Mounts

Bind Mount Example:

For a bind mount with Nginx, you’d specify the local directory directly in your Docker Compose file:

services:
  nginx:
    image: nginx:latest
    volumes:
      - /data/nginx/data:/usr/share/nginx/html

This configuration mounts /data/nginx/data from the host to the Nginx container. Note that for this to work in a Swarm, /data/nginx/data must be present on all nodes.

NFS Volume Mount Example:

Using NFS volumes, especially preferred for Docker Swarm setups, you’d first ensure your NFS server (at 192.168.0.220) exports the /data directory. Then, define the NFS volume in your Docker Compose file:

volumes:
  nginx_data:
    driver: local
    driver_opts:
      type: nfs
      o: addr=192.168.0.220,nolock,soft,rw
      device: ":/data/nginx/data"

services:
  nginx:
    image: nginx:latest
    volumes:
      - nginx_data:/usr/share/nginx/html

This approach mounts the NFS shared directory /data/nginx/data into the Nginx container. It allows for seamless data sharing across the Swarm, simplifying data persistence in a multi-node environment.

Conclusion

Choosing between bind mounts and NFS volume mounts in Docker Swarm comes down to your specific requirements. NFS volumes offer superior flexibility and ease of management for distributed applications, making them the preferred choice for scalable, resilient applications. By leveraging NFS for services like Nginx, you can ensure consistent data access across your Swarm, facilitating a more robust and maintainable deployment.


How to Create a Macvlan Network in Docker Swarm

In a Docker Swarm environment, networking configurations play a critical role in ensuring that services communicate effectively. One such configuration is the Macvlan network, which allows containers to appear as physical devices on your network. This setup can be particularly useful for services that require direct access to a physical network. Here’s a step-by-step guide on how to create a Macvlan network in your Docker Swarm cluster.

Step 1: Define the Macvlan Network on the Master Node

The first step involves defining the Macvlan network on the master node of your Docker Swarm. This network will be used across the entire cluster. To create a Macvlan network, you’ll need to specify a subnet, gateway, parent interface, and make the network attachable. Here’s how you can do it:

docker network create -d macvlan \
  --subnet=192.168.0.0/24 \
  --gateway=192.168.0.1 \
  -o parent=eth0 \
  --attachable \
  swarm-macvlan

This command creates a Macvlan network named swarm-macvlan with a subnet of 192.168.0.0/24, a gateway of 192.168.0.1, and attaches it to the eth0 interface of your Docker host. The --attachable flag allows standalone containers to connect to the Macvlan network.

Step 2: Verify the Macvlan Network Creation

After creating the Macvlan network, it’s important to verify its existence and ensure it’s correctly set up. You can inspect the network details using:

docker network inspect swarm-macvlan

This command provides detailed information about the swarm-macvlan network, including its configuration and any connected containers.

To list all networks and confirm that your Macvlan network is among them, use:

docker network ls

This command lists all Docker networks available on your host, and you should see swarm-macvlan listed among them.

Conclusion

Creating a Macvlan network in Docker Swarm enhances your cluster’s networking capabilities, allowing containers to communicate more efficiently with external networks. By following the steps outlined above, you can successfully set up a Macvlan network and integrate it into your Docker Swarm environment. This setup is particularly beneficial for services that require direct access to the network, providing them with the necessary environment to operate effectively.


Moving Docker Swarm’s Default Storage Location: A Guide

When managing a Docker Swarm, one of the critical aspects you need to consider is where your data resides. By default, Docker uses /var/lib/docker to store its data, including images, containers, volumes, and networks. However, this may not always be the optimal location, especially if you’re working with limited storage space on your system partition or need to ensure data persistence on a more reliable storage medium.

In this blog post, we’ll walk you through the steps to move Docker’s default storage location to a new directory. This process can help you manage storage more efficiently, especially in a Docker Swarm environment where data persistence and storage scalability are crucial.

1. Stop the Docker Server

Before making any changes, ensure that the Docker service is stopped to prevent any data loss or corruption. You can stop the Docker server by running:

sudo systemctl stop docker

2. Edit the Docker Daemon Config

Next, you’ll need to modify the Docker daemon configuration file. This file may not exist by default, but you can create it or edit it if it’s already present:

sudo vi /etc/docker/daemon.json

Inside the file, specify the new storage location using the data-root attribute. For example, to move Docker’s storage to /data, you would add the following configuration:

{
  "data-root": "/data"
}

Save and close the file after making this change.

3. Move the Existing Data

With Docker stopped and the configuration file updated, it’s time to move the existing Docker data to the new location. Use the cp command to copy all the data from the default directory to the new one:

sudo cp -r /var/lib/docker/* /data/

This step ensures that all your existing containers, images, and other Docker data are preserved and moved to the new location.

4. Restart the Docker Server

After moving the data, you’ll need to reload the systemd configuration and restart the Docker service to apply the changes:

sudo systemctl daemon-reload
sudo systemctl restart docker

Conclusion

By following these steps, you’ve successfully moved Docker’s default storage location to a new directory. This change can significantly benefit Docker Swarm environments by improving storage management and ensuring data persistence across your cluster. Always remember to backup your data before performing such operations to avoid any unintentional data loss.